
Vuetify is a Material Design component framework for Vue.js. It aims to provide all the tools necessary to create beautiful content rich applications.
Similarly, Vue Router is the official router for Vue.js. It deeply integrates with Vue.js core to make building Single Page Applications with Vue.js a breeze. Features include:
- Nested route/view mapping
- Modular, component-based router configuration
- Route params, query, wildcards
- View transition effects powered by Vue.js’ transition system
- Fine-grained navigation control
- Links with automatic active CSS classes
- HTML5 history mode or hash mode, with auto-fallback in IE9
- Customizable Scroll Behavior
Likewise, Laravel is a free, open-source PHP web framework, created by Taylor Otwell and intended for the development of web applications following the model–view–controller architectural pattern and based on Symfony.
So how is it possible to combine three of these in one single project?
I am here to help you integrate Vuetify and Vue Router in your Laravel Project.
Follow these steps:
1. Install a fresh new Laravel project.
laravel new vuetify-laravel
2. Once the project has been created. Launch it through a code editor.
3. We need to scaffold the frontend. Therefore we need to insert the laravel/ui package into our project.
composer require laravel/ui
4. We need to specify the preset with which we want to scaffold our frontend. In our case, we will be using vue.
php artisan ui vue
5. Now, let us install Vuetify and Vue Router into our package dependencies.
npm install vuetify vue-router
6. These packages have to be imported into the resource>js>app.js file. But to organize the codes, I am going to create two new files router.js and vuetify.js in the js folder of Laravel. After the files have been created, type the following code in their respective files.
My directory structure:

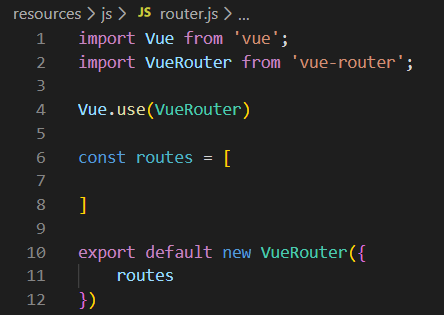
router.js
vuetify.js

7. Now, let’s import these files from the app.js

8. Install and compile the project.
npm install && npm run dev
9. Since we have not defined a div with an id of app in our blade file. For that, let’s create a new blade file in resources>views folder.
app.blade.php
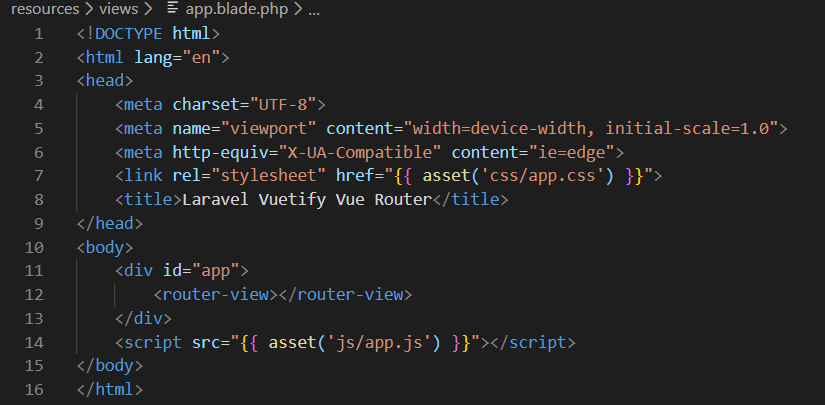
The css and js files will all be compiled within the css and js folder inside the public directory respectively.
The router-view tag is where our components will get loaded.
For this example, I will be using the ExampleComponent which comes automatically with vue preset. It is located inside resources>js>components>ExampleComponent.vue
To use the ExampleComponent, we need to import it into our router.js file. Let’s do it.

10. Once we have imported the ExampleComponent. Let us import the vuetify, material design icons and fonts through the app.scss file located in resources>sass>app.scss
Delete all the bootstrap code inside the app.scss and type the following:
app.scss

11. The route has not yet been defined for our blade file. The route must be defined inside the web.php file which is located inside the routes folder of Laravel.

12. We have to compile everything to get everything to work.
npm run dev
13. Start the server.
php artisan serve
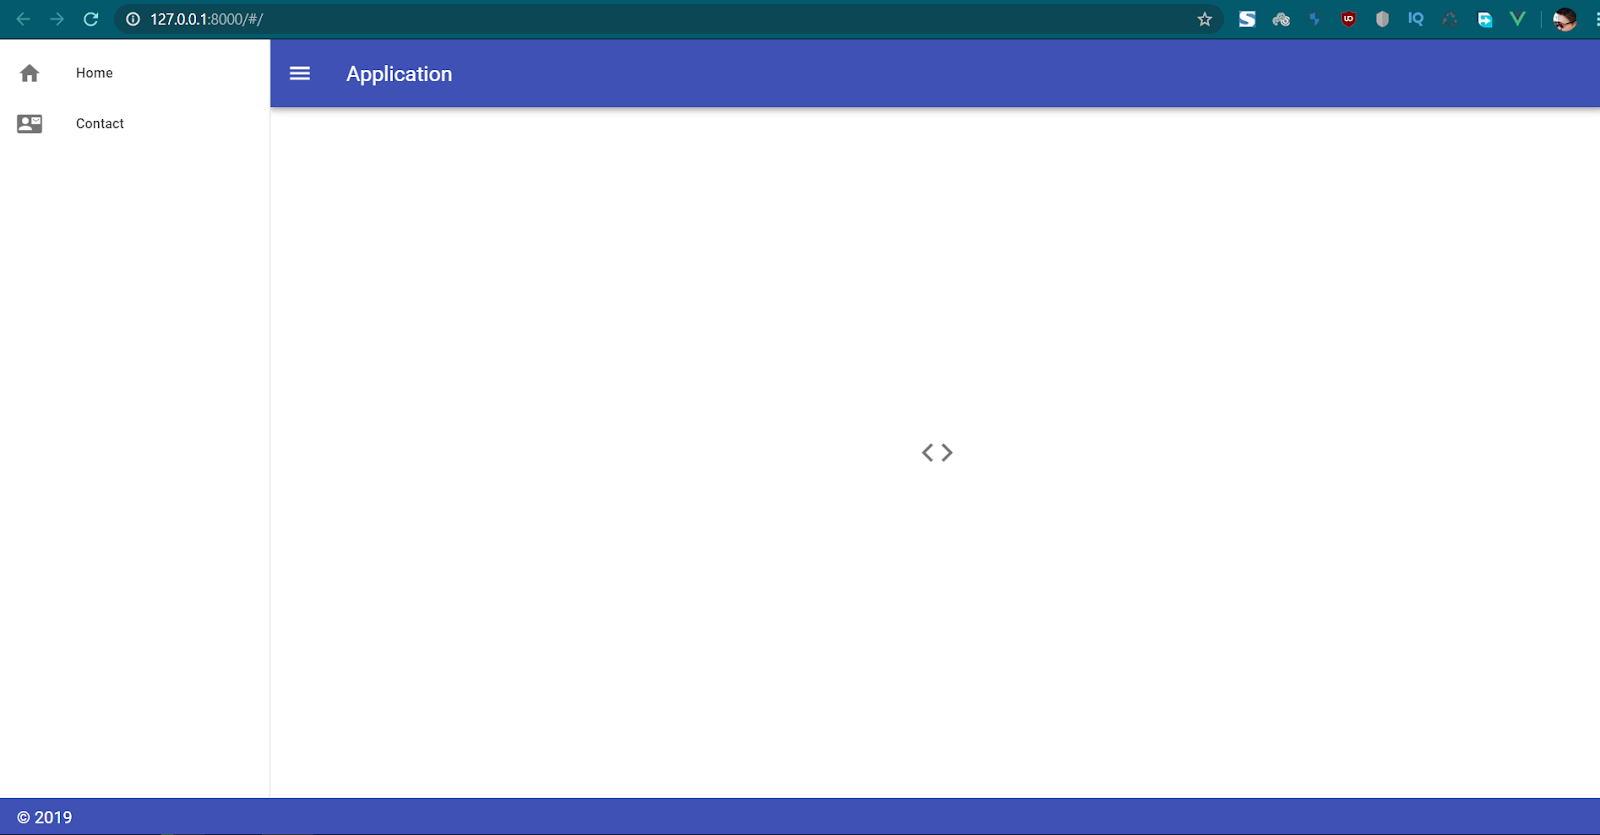
14. If this appears on your screen, everything is working fine.

15. Now let’s import a predefined vuetify layout into our ExampleComponent.vue file. [Get the Source Code]
<template>
<v-app id="inspire">
<v-navigation-drawer
v-model="drawer"
app
>
<v-list dense>
<v-list-item link>
<v-list-item-action>
<v-icon>mdi-home</v-icon>
</v-list-item-action>
<v-list-item-content>
<v-list-item-title>Home</v-list-item-title>
</v-list-item-content>
</v-list-item>
<v-list-item link>
<v-list-item-action>
<v-icon>mdi-contact-mail</v-icon>
</v-list-item-action>
<v-list-item-content>
<v-list-item-title>Contact</v-list-item-title>
</v-list-item-content>
</v-list-item>
</v-list>
</v-navigation-drawer>
<v-app-bar
app
color="indigo"
dark
>
<v-app-bar-nav-icon @click.stop="drawer = !drawer"></v-app-bar-nav-icon>
<v-toolbar-title>Application</v-toolbar-title>
</v-app-bar>
<v-content>
<v-container
class="fill-height"
fluid
>
<v-row
align="center"
justify="center"
>
<v-col class="text-center">
<v-tooltip left>
<template v-slot:activator="{ on }">
<v-btn
:href="source"
icon
large
target="_blank"
v-on="on"
>
<v-icon large>mdi-code-tags</v-icon>
</v-btn>
</template>
<span>Source</span>
</v-tooltip>
</v-col>
</v-row>
</v-container>
</v-content>
<v-footer
color="indigo"
app
>
<span class="white--text">© 2019</span>
</v-footer>
</v-app>
</template>
<script>
export default {
props: {
source: String,
},
data: () => ({
drawer: null,
}),
}
</script>
16. Stop the server by pressing CTRL + C or you can also create a new terminal and compile the code again.
npm run dev
17. Run the server if you have stopped it in the previous step and if you have created a new terminal to compile the project in the previous step, just refresh your browser.
The final result:
I hope you have successfully integrated vuetify and vue router in your laravel project.
If you are facing any errors, kindly comment below and I shall help you to solve it.